Over the many years that we have encouraged and taught so many people about the art of metal casting, there are always going to be standout stories of success.
This is the Tim Taft story…
Tim has a right to be mighty proud of what he has achieved from such a humble beginning.
We think that his story deserves to be told for no other reason than to encourage and help others to understand that hobby metal casting success can be achieved no matter what walk of life you may have come from.
Tims quest was, I must admit very ambitious, but his success has been exceptional, where perhaps others may have failed.
When Tim first approached us with his ideas, I was a bit reluctant to say that what he wanted to do was possible for a beginner to achieve.
But he was certainly pumped and very eager to try his hand at metal casting work.
You see, Tims main goal was to make patterns to sand cast motorcycle engine crankcases.
Heck, I can already here the exclamations… Your kidding me! – What? You mean a beginner is going to do what?… Make crankcases for Go Kart race engines… Good luck buddy, some might say.
The best thing is to let Tim tell the story in his own words, and we’ll intersperse that with some photos of his castings.
The Story Begins:
This is a fairly short trip down the road of my home foundry, and it’s objective and purpose.
I’m a 54 year old (Now a little older in 2018) auto body tech moved to Florida from the cold north of NY. I have a son who also enjoys my hobby and sport of open modified kart racing.
We compete with a local and National series called the Unlimited AllStars.
Most kart engines are of Italian manufacture in open kart racing, but a few others have crept in, one from Germany and another from Canada.
Engine displacement runs from;100cc 125 to 150cc 2 cycle and 300cc rotary Wankle engines.
These engines cost in the neighborhood of $3,000.00 to $5,000.00 each and produce from 40 to 60 Hp, most running on Methanol.
A few years back the series opened up the competition rules to include Motor Cycle engines from the Moto-Cross market, displacements are limited to 500cc 4 cycle and 250cc 2 cycle, single cylinder engines. Twin engines are legal in the series but a combined 215cc limit to those
combination engines.
The cost of racing is a major factor in all motor sports, and karting is no different. But seeing I raced MX in my youth this rule fell right into my lap.
Also seeing that 4 cycle engines mostly from the lawn and garden origin have been the only staple of 4 cycle engines in karting from
it’s inception, this new rule opened up some very serious big HP torque engines now available to our racers.
I soon jumped on Ebay and found a 2008 RMZ 450 motocross engine with a broken tranny case for a cheap $500.00 and this triggered the journey which ended up with the building of my home foundry.
I cut the transmission off, the clutch transmission gears, every thing came off leaving me with a raw basic kart specific engine. The weight loss was significant as well as the HP gain dumping the reciprocating mass of the heavy oil clutch and gear assembly.
Adding a kart jackshaft, remote chain driven oil pump, and a remote water pump and a belt drive system to the jack-shaft, this completed the conversion. All this was done with a drill press, saws all, and a skill saw. I had zero machining experience up to this time.
Over the next year I was involved in kart competition up and down the eastern sea board and had several top 5 results as well as a win with this engine package.
Mostly I had so much power I ran half throttle to keep from burning the tires off the kart and to avoid running over those 40-60HP factory build engines. Very power full and very reliable engine combination.
Now as well as foundry and Machining Blogs, I’ve been a member of a karting blog. a Kart engine manufacturer in Canada began a thread on a Billit 150cc engine they were going to build specifically to compete with and beat the now dominate 300cc German made Wankle engine.
The Italian 125cc corner stone of kart racing engine stopped production of their Sudam air cooled model engine a few years ago. It’s known that these engines would become harder and harder to find as parts and pieces get used up and new ones were no longer available.
I asked the manufacturer if it would be possible to Machine a set of cases to adapt the 250cc 2 cycle MX engine to karting, seeing as he already was designing a 150cc engine complete. It seamed to me MX engine components are massively available and cheap.
His response to me was it would be to costly to bother and the MX engines wouldn’t compete. This began my research into developing a program including a the G codes to present to a CNC machine shop to have MX conversion cases made to convert them to karting.
lot’s and lot’s of questions, research, and cost discovery’s. I decided that to pursue this tact it would be a long time and my costs in time and dollars would be a pile.
I got to thinking that the factory engines as well as the MX engines were all castings. So I started researching home casting of alumium on Utube. Wwwwwwwwweeeeeeellllllll, Hey, I can do that! I decided right away. And this whole trip began to roll.
Right off the bat I found Col Crouchers eBook package, bought it and began reading it front to back over and over and over. I still go back and reference it even now, a whole year and a half later lol.
This Is What I Built.
Col C recommends starting small and working up, But I thought, to heck with that, I’m goin for the deep end, I’m not wasting any of my time casting some thing I don’t need just to learn. I’ll cast what I want, and learn from that it doesn’t cost 1 dime more to do it this way.
I bought a 55 gallon drum for 4.00 used a 12″ cardboard form tube, (wouldn’t do that again) it gets wet from the concrete and won’t come out till you burn it out. Use aluminum or some thing more smooth and ridged.
I research all kinds of home brew refractory cement, and ended up driving a 1 1/2 Hrs away and buying the real deal, 750lbs of it about $500.00. I don’t recommend home brew products in critical areas of your foundry, just spend the extra bucks and it’ll be right and you won’t be sorry, and you won’t waist your time or extra dollars. (Tim is right)
The furnace top is 4″ thick and weighs about 170lbs, I used a butter tub to form the center hole, the base is 4″ thick as well and the walls are 5″ thick. leaving a 12″ center for very large crucibles, once I get up to pace and can pour multible castings at once.
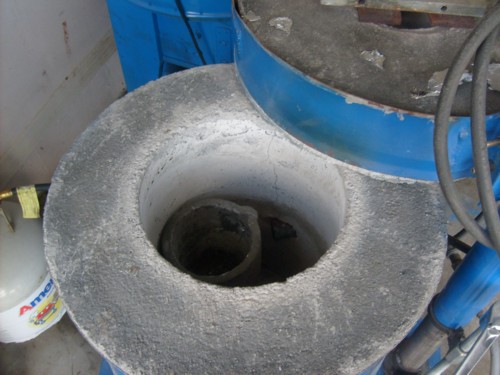
A very simple jack screw raises the top and pivots off a axle housing from a wrecked 2011 mustang I got from work. Plenty heavy to carry the load and freeeeeeeee.
The burner it’s self. a piece of 1″ black iron pipe 12″ long, a 1 1/2″-1″ reducer makes up the venturi, a 1/8″ cross pipe drilled with a .040 bit locked center by a 1/4 20 jam bolt. hooked up to a 20lb propane tank and she’ll melt 20lbs of cut up alumium alloy car parts in 45 minutes. I do point my shop fan at the burner to increase air flow and to help vent the gases up out of the furnace and out of the garage.
A Sand Muller.
You have got to have one, don’t waist one second of your time hand mulling any thing. I built the one in Col C’s book. I wouldn’t do that again either, it’s great for mulling very small amounts. But 200lbs of sand is (4) 50lb bags, the little LP mullers only hold less than 10lbs at a crack.
This is a shop fan housing ( bad motor free bee) a couple pieces of 3/4 plywood base a 1/8 sheet of steal for the wear plate, a 3/4 center shaft with 3/4 (kart) bearings and a electric motor out of a small bench drill press I manages to bend trying to mill my oil pump for my kart.
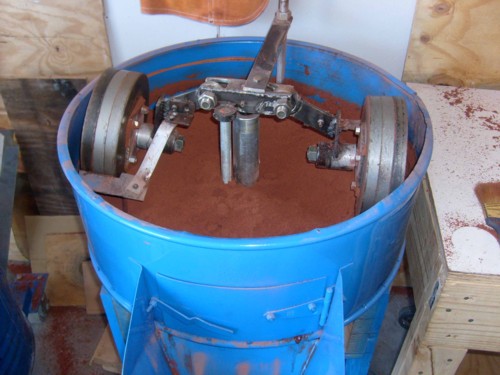
The motor has plenty of power with the gear reduction a made. (more kart parts and #35 kart chain to drive it). A trip to the used weight
lifting store and presto I can Mull 50lbs of petro bond sand at a time. Maybe $50.00 spent on this whole thing.
I also did the whole green sand thing, home brew blah blah blah. another total waist of time and effort in my view. had all kinds of trouble with steam blows and even small nasty looking castings. ground up piles of kitty litter wrecked a couple blenders. I threw it all out. I bought Petro bond sand chemicals.
They are cheap, easy to use & understand and it works awesome. I have not had one single issue with steam porosity or any casting flaws other than my design failures. Col suggest 3 degree tapers and he means it haha.
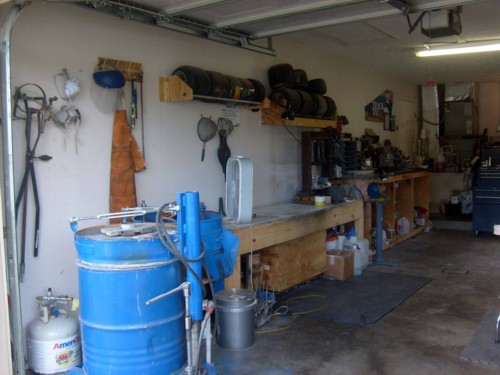
The foundry bench. it serves as a work bench also. heavy & sound and does a nice job. gotta paint it blue yet. It holds 600lbs right now with room for a couple hundred more. And I need to add the 200lbs. You use a lot of sand making even these small engine cases.
I have stream lined the size of my flasks. Picking up a cope and drag 12″x12″x 5 1/2″ tall is way heavier than you might think. I’ve cut the height down 1 1/2″ and it made a huge difference.
I use sodium silicate RU grade. tried the cheap stuff, it doesn’t work well at all. don’t waist your time cheeping out on this either. The C02 hardens it nice quick and then I pop it in the micro wave for a few minutes to complete the dry cycle. Sand absorbs MW very well so carefull touching after you nuke it.
Now To The Castings:
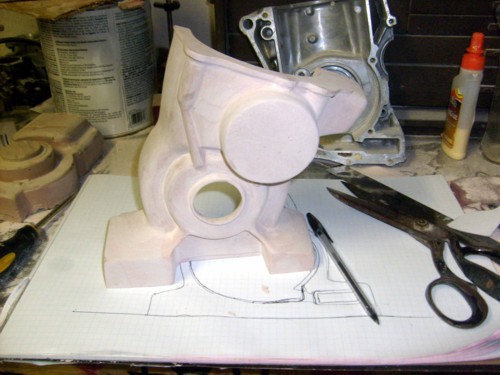
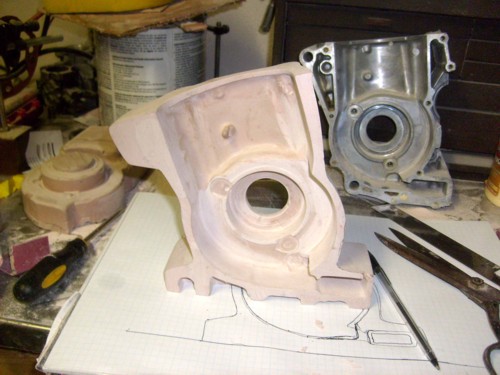
My original attempt. This was my Idea to make a one mold fits all MX 2 cycle 250cc engines. It didn’t work. while this is the same mold I use now It’s been highly modified and will only work with case inducted 250cc engines.
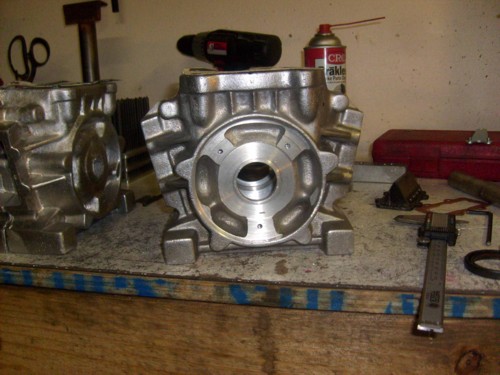
I made a whole new mold for the cylinder inducted engines. they’re much shorter and wider than the case inducted engines. The set of cases next to the gray mold are a set of 1980’s Komet K35 case inducted 135cc kart engines. made by the Italians.
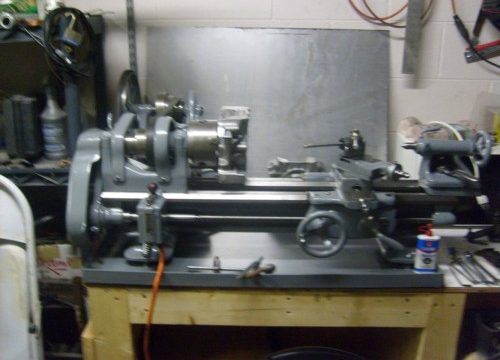
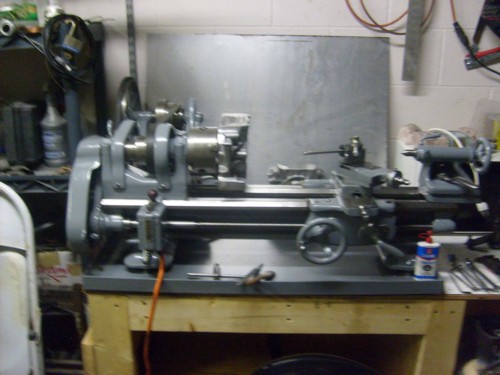
And while I was at it, I bought a 1935 south bend 9″ lathe for $300.00. then completely took it apart, cleaned and refinished it. works awesome, and I learned how it works by just taking it apart and putting it back together and watching utube videos.
Aint the internet great?.
Along with casting and Machining all this I’ve learned about heat treatment of cast alloys. I use only quality alloy castings. mostly from the auto industry. some 6061 from scraps. the auto castings are mostly 351, it’s a little heavier than 6061 but very simular in its alloy content.
Now just cast and out of the flask it’s soft as butter even being that it’s alloy.
It has to be hardened. I’ve experimented with getting it out of the flask and into the water as quickly as possible. It works pretty good but it’s a gamble. the petro bond sand will catch fire too soon and the casting some times will tear in half under it’s own weight.
I’ve been working on a heat treatment station but it’s not complete yet so no pics of that mess just yet. It’ll be a dual burner much like the furnace, heating 2 steal plates in a hot box.
The Idea is to heat the castings to 1100 degrees. I’ll have a proper pyrometer to measure this as it is quite critical. Then they’ll get dumped into a water pail (steel) I found that 1000 degree aluminum will boil 10 gals of water instantly and still be hot enough to melt through the bottom of a plastic bin.
After this heat cycle, I’m going to buy a set of hot plates. (My girl friend will not tolorate me putting these cases in the oven) the castings will sit for 8 hours on the hot plates (boxed as well) then normalize at room temp. This will be the best I can do for heat treatment of my castings.
So far as I know now lol.
All these cases will need supporting parts, jack-shafts, belt drivers, driven pulleys, hubs water pumps oil pumps expansion chambers for the 2cycles. I intend to build and provide all the parts needed to completely convert a Factory MX engine over to kart racing. It’s a wide open market and I hope it goes over well. I know I’ve learned volumes from this so far and it’s only the tip of the ice berg.
Hope you enjoy my project and I hope it helps some that read and view it.
Col Croucher of myhomefoundry.com has been a massive help and inspiration for the building and setting up my foundry.
Enjoy
Tim Taft- USA.